How to Organize Family Games and Save Space!

We have a ton of family games and ask my kids have transitioned out of simple kid games, we’ve gotten quite the stockpile. That’s also not counting decks of various cards, dice, etc. In an effort to clean the house during these socially distant times, as many people have been doing, I thought, surely the kids will let me toss a few of these old games, right? Not really. Although I have to admit I have a soft spot in my heart for cooperative kids games like Molerats in Space and Dinosaur Escape – those are just plain awesomeness – so I wasn’t too upset about it.

Time to get creative! A few weeks back I scored a major sale at Michael’s on some photo organizer bins ($14! although then this week they were $10 – grrr). Anyway, I bought 2 clear ones for my son’s loose Legos (not his sets), one for my daughter because: siblings, and another as an extra for replacements in case of breakage (the interior boxes are a little flimsy and if they’re overstuffed, the hinges will totally break).

The Lego organization was glorious for a super organizer like me – color sorted with separate bins for figurines, plant life, and special glowy pieces. Sorry, no picture :( My son is always asking me to help him find such-and-such necessary piece. However, a yellow box morphed into yellow + brown + gold during a creative build session involving buried treasure and after a few rushed clean-up sessions you would never have known it was once color-coded. Luckily, due to some other COVID-related rearranging, we brought up an old train table and decided to convert it to a Lego build area in his room. I asked my son if he would rather just have all the Legos out on the table to push around (on the condition they STAY on the table!!!) – and he agreed, so we dumped out all the bins and I inherited another photo storage organizer.

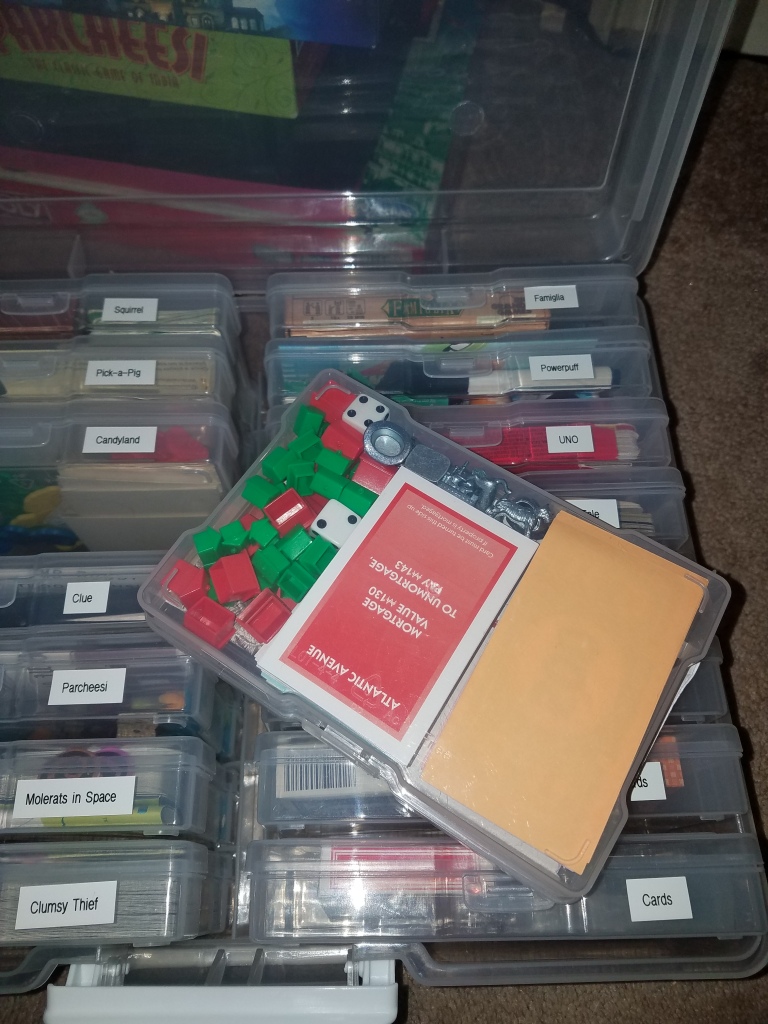
I was pumped! But what to do with all this organizing potential? Certainly not photos. Many of my photos have been turned into 30+ photo books currently on my shelf and the rest are on USB storage files that I try to forget about now that Shutterfly has stopped sending me endless free photo book promos. *tears!* It was good while it lasted! But this weekend the idea hit me! Most of the board games we have are a board folded into quarters and a handful of game pieces. The game boxes look nice but they really do take up a TON of space! Introducing the ultimate family game night organizer.

I was so in the flow of my idea that I forgot to take a before picture, but the pics below shows all the space I was able to gain (16 vertical inches!) – the pink & black box was actually open and overstuffed on the top of the pile with loose Pokemon cards, missing game pieces, other cards, dice, and small game boxes like the Sneaky Squirrel Card Game that couldn’t stack with traditional games. So really it was even more height gained. My entire shelf space was full to the top, teetering, cluttered and messy. These empty boxes all went straight into the recycling!

And yes, just to be clear, not all of the empty boxes shown were originally on the shelf you’ll see below (Monopoly is too wide to fit) and there were other games in the shelf that haven’t been pictured yet. I haven’t shown you my extended game storage I had to create near the ceiling. That game storage area still exists, but it looks so much better, as you’ll also see below. Now I need to unload everything else in this mini bookcase-thing (DVDs and video games) to lower the shelves!

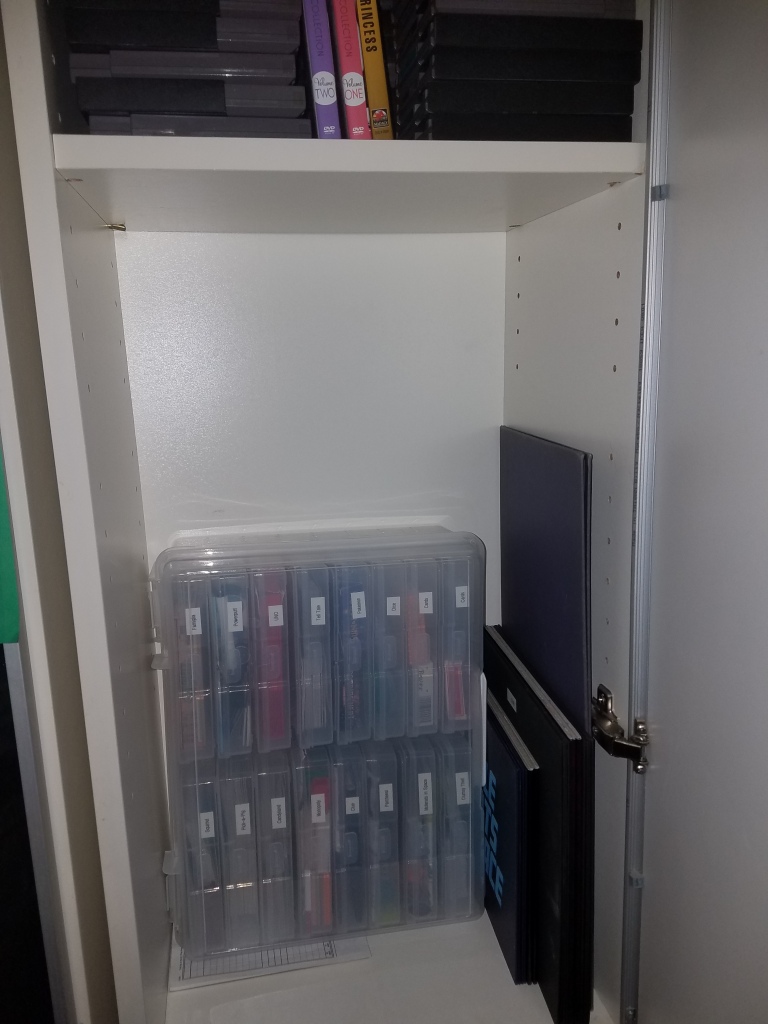
Below is my newly organized extended game storage for games without boards (i.e. Connect 4 or Yeti in my Spaghetti) and games that had instructions printed on an insert instead of on a brochure or paper (Dinosaur Escape – I’m looking at you!). Now if you love efficiency, you might be thinking that the right stack of game boxes could probably fit back in the shelf and then I could put my new game organizer near the ceiling which might even look better. I thought about it! But 1. I like the balance of the game boxes on top and 2. organization is nothing without functionality for your family. My kids are currently using the games in the organizer more often and I want them to have easy access. I’m a short person and I have to go grab the big step stool to get the other games down. haha.

OK, grab your label maker and follow along! As mentioned above, I recommend that you only decant games that have paper instructions you can fold to fit in your box. You can find almost all game instructions online, but it’s a huge hassle to go over the rules 100x with kids when you’re looking them up on your phone or they want to find the info themselves. And then if you happen to land upon a site talking about alternate rules or ways to change the game… uhg. And what if you want to pull down a game during a power outage when the internet is down? That is one of the perfect times for a family game night… just saying. ;)

After you’ve selected the games you can downsize, make sure all the pieces will fit before you print your labels. FYI Monopoly fits! (even with our individually rubber banded hands from the last game we didn’t finish). However, my husband unexpectedly had a very strong connection with the plastic money holder that comes in the box, haha, so maybe check with picky family members first too. (He has vowed to craft a Monopoly money holder out of wood one of these days). Also note: some games we kept in their original boxes inside the bin like UNO. Once your bins are full, label away!

A big part of organizing is doing what works best at this time right now. Even if I have plans to change things later when I have more time or money, I often just need to find a “good-enough” solution. As much as I hate clutter, I also need to be able to see things, or they will not get used. Eventually I’d like to build watch my husband craft a built-in couch or kitchen bench for us (still undecided) with drawers underneath to store all these games. But for now, I believe we pull out our family games much more often because they’re in our line of sight and that is a very good thing.

Oh shoot…

*All opinions in this post are 100% completely my own
and this post was not paid for or sponsored in any way.
However, I use affiliate links to receive a commission
if you decide to use those links. This does not cost you

anything. Thank you!

The Best Easter Egg Hunts


Easter Collage

This year is totally different from last year – after a fake-out warm week, we’re back down to below freezing!!! The good thing about Easter Egg Hunts though, although they’re usually outside, is that they’re over in about 2 minutes (if you’re not organizing it yourself, of course). But, that same pro can turn into a con if the hunt is not handled correctly. Nobody wants to see older kids with brimming baskets and tiny toddlers in tears who weren’t even able to grab a single egg. And I cannot believe we hear stories every year of kids getting hurt or trampled when parents go crazy.

This year we got 2 egg hunts due to interstate travel visiting the grandparents that weekend. But since I have a 5 year old, we’ve got a few years experience. Let me share what we’ve found works best:

  1. Completely separate egg hunt areas by age group. Preschoolers hunt in one spot, bigger kids in another (and if you can break it down even further to 3 or 4 different areas by age group – even better!). The bonus here is that you can lay all the eggs in plain sight for the little ones without worrying the bigger kids will scoop them up first. And you can make the hunt a nice challenge for the older kids.
  2. Sometimes you just don’t have an easy way to create separate areas. For example, we went to a hunt in one small town that was using their large village green. However, they helped solve the problem by having the big kids go to the far end of the field, while the little ones stayed close, with the goal of meeting in the middle.
  3. An egg limit! If the eggs are filled, post a rule of no more than, say, 10 eggs per person to ensure all kids get some. Repeat, repeat, have the kids repeat, repeat again, and make signs. That should ensure at least 60% follow the rule…
  4. Even better than an egg limit? Empty eggs!! If you take away the greed factor – where it doesn’t really matter how many eggs you pick up – kids are generally better behaved and more likely to let a little one take that last egg. Have all the kids turn in their eggs at the end of the hunt by dumping them in a big box, and then hand out pre-packed, identical goodie bags to everyone!

Remember: your local Easter egg hunt is not The Hunger Games.


Mud Season

Snow last week; almost 70 degrees one day this week! So, of course, my kids spent that whole day in the yard. Daddy started doing some spring cleaning (please excuse the piles of recycling). My 2.5 year old went through 3 pairs of pants in as many hours. He later moved on to the surprisingly less wet activity of ice throwing/smashing. And my almost 5 year old came inside with “my friend beetle” in her hair (who later flew away). Goooooood times. :) Here’s my video to commemorate. Welcome to Mud Season in Vermont!!!

Minted.com Art Collection Review

I have a mild obsession with home decor. Not that I actually go through with most of it, but man, I could spend hours pouring over Pottery Barn catalogs, Martha Stuart Living magazines and Pinterest (oh my god the ideas on Pinterest!). Now that we’re done with apartment living and finally in a house of our own, the obsession has grown 100 fold but our light blue master bedroom walls, for example, are still completely bare after almost half a year here. (yikes!)

You might know Minted.com for their beautiful & customizable cards, invitations and birth announcements. But did you know they also sell ornaments, garlands, table runners, day planners, personalizable photo backdrops and tons more? When Minted approached me to review their Art Marketplace, I took it as a sign it’s time to start getting serious about decorating my house.

Minted Collage 1

Some gorgeous artwork available at Minted.com

First, I love how easy it is to navigate the Minted.com site. With their filters, if you’re looking for specific artwork, say a personalizable print for your little boy … no problem. How about limited edition, abstract art in non-traditional colors and a portrait layout? Yep, they’ve got a bunch of those too. It’s really amazing how much variety Minted offers (and how much of it I liked!).

But, I still wasn’t exactly sure what I wanted, so I let my kids go first and hoped for inspiration along the way. The kids previously had an ocean inspired theme to their bedroom, but as my daughter has recently developed an all-consuming obsession with bright orange (luckily we convinced her to go with just one wall instead of the whole room), the marine life doesn’t really fit as well as it once did. We picked an orange color filter (of course) at Minted.com/Art and scrolled through the limited edition prints. My daughter immediately began calling out favorites:
minted orange collageI also love that if you scroll down to the bottom of any page, Minted shows you a person holding the art in every size offered so you can see exactly how big your picture will be when it arrives. And, when you click on a frame, you can see how each picture will look in each specific frame. Some pictures even have a few different customizable color options like the Schooner design below. Although I do know what an 8×10 looks like, I found myself checking to see how the print looked every time – it was comforting and sometimes actually had me going bigger or smaller.
minted Collage 2

 I’m still looking through all the options, but once I make my final decision and place my order, I’ll be sure to share with you what I think about these prints and frames in person. And if you’re looking for a great Christmas gift, there’s still time with 2 day or overnight shipping!

Plus take advantage of these great offers: Enjoy 20% off art & gifts. Code: GIFT20 | Free 2-day shipping on art orders $75+. Code: ARTFS2

This post is sponsored by minted.com. I received a Minted credit in exchange for my time and honest review. My opinions and ridiculously awesome picks are 100% mine.

Save

Save

Our DIY Frozen Halloween – Family Costume How To

Disney Frozen Halloween Costumes How To - Olaf and Anna

My daughter (along with half the kids in the US) decided she wanted to be a character from Disney’s Frozen movie this Halloween. After she made the big decision of which character (Anna) and we negotiated how the rest of the family would fit in (“Nobody is Hans because he’s a bad guy.”), I got down to the business of assembling our costumes as a mixture of bought (mostly at Old Navy with coupons!) and DIY pieces (because I do not have time to learn to sew dresses!).

Here is my do it yourself process:

How to DIY your own Frozen Anna Coronation Hair Ribbon

I fell in love with Anna’s Coronation outfit (which I found cheap on eBay direct from China) and convinced O to go along with the green instead of Anna’s typical snow travel ensemble (which involves a dress AND a cape). The hairpiece was the easiest part and I think it allowed us to not have to totally copy Anna’s intricate ceremony hairstyle (we just slicked her hair up in a bun instead).

HOW TO: For her hairpiece we picked out 3 sparkly ribbons: a light green, a dark green and gold. I cut pieces of equal length from each and hot glued them to a barrette (from A.C. Moore). Then I tied another piece of gold into a bow and hot glued just the back of it to the barrette (tip: put your fingers in the bow loops as you glue so the tops don’t get stuck  or your clip will look smooshed). Easy!

How to DIY your own Frozen Anna Boots
Although technically Anna wore more formal shoes to the coronation, it’s getting pretty cold over here, so function won out (plus my daughter needed some fall/winter transition shoes). Luckily, she was okay with it because these boots are clearly featured in the movie during Anna’s visit to Wandering Oaken’s Trading Post & Sauna. I picked out The Children’s Place Ryder Boots to decorate.

HOW TO: I printed a picture of the costume boots from The Disney Store to use as a guide. Then I sketched out my design in chalk (you can easily wipe chalk mistakes off faux leather like this with a damp cloth or finger). I started out with Fun Paint Glitter Glue in gold but the applicator tube was too big and I knew all my lines were going to run together. Then I tried Martha Stewart’s brand glitter glue in lemon drop (pack of 16 assorted colors on clearance at A.C. Moore!) which had a perfect, long thin applicator but the yellow turned green on the black boots. I had to empty the Martha Stuart glue and replace it with the gold in her small tube but then I just traced my design and let the boots dry overnight.

How to DIY your own Frozen Elsa Hair Crown Braid
If my daughter is Anna, you know Mommy has to be Elsa. Since I have a pixie, I knew I’d need faux hair for Elsa’s signature over the shoulder single braid. Doing just a braid crown took less time than crocheting an entire hat and attaching the braid and I think it turned out pretty good!

HOW TO: First measure loosely around your head and down your shoulder to where you want your braid to fall and then double that length (I probably also added a few extra inches to be safe – better too long than too short). I picked a white yarn with some sparkle and cut about 200 pieces that size. Yes, it will be tedious, but turn on a movie and you’ll get through it before it’s over. Tip: make sure you lay your pieces of yarn out so that the ends on one side are lined up (doesn’t have to be exact) to save time and frustration later. Next, holding all your cut pieces together, tie a knot at the lined up end and stick it under something heavy (I put it under my laptop). Comb through the yarn with your fingers to make sure it’s not tangled (take your time!), divide it into 3 sections and braid. Use a large hairband to hold the end of your braid temporarily.

Find the center of your braid and hold the center up to your forehead. Wrap the ends behind your head so that it feels comfortable but not too loose (remember the yarn will stretch) and tie that permanently. I used two of those tiny rubber band hair ties (since they always break). Now, unbraid your 2 tail ends and re-braid them together into a single braid. Secure the end permanently and trim your ends even.

There are lots of ways to decorate your Elsa hair braid and I thought about getting some sparkly snowflake jewels but when I stumbled across these paper snowflakes in the scrapbooking section of A.C. Moore, I knew I wasn’t going to find a better deal. Put 2 aside for your shoes and hot glue the rest to your braid.

Perfect to DIY your own Frozen Elsa Costume
I already owned a blue skirt and I found this very Elsa-looking top on Amazon for $10!!! I decided to do without the cape (partially because somewhere inside I was convinced my daughter would change her mind at the last second and steal my costume identity) but I did buy some rhinestone stickers for $1.99, also from the scrap-booking section at my local craft store, and my 4 year old had a blast sticking them to me. Yes – they fell off all over the place but she went a little overboard so I had plenty to spare. :)

How to DIY your own Frozen Elsa Costume Shoes
I kept 2 snowflakes leftover from Elsa’s hair and hot glued them onto some teal blue Sueded Pointed Toe Flats from Old Navy. These are another totally different shade, but at least all the pieces of my costume were blue, right?

How to DIY your own Frozen Costumes for a Family - Olaf and Sven
For my son’s Olaf costume, I decided to plan everything around the hat but so many of them were kinda scary looking I was relieved to find this Disney Frozen Flipeez Olaf Hat on Amazon. From there I had planned to put him in just a big, cheap white sweatshirt but I couldn’t find any anywhere! I thought I might have to settle for like 3 layered white shirts for warmth when I noticed a shearling lined brown jacket in the Toddler department. Turned inside out, those unlined brown arms become instant sticks and I have my (off) white snowman. Oh, except there was brown down the center for the zipper too – so I actually had the jacket inside out and backwards. My little guy didn’t seem to mind one bit though. Circles of sticky-back black felt were used as faux buttons and easily covered the interior jacket tag. The best thing about this costume is that I can use all the pieces again later throughout the winter – no waste! :)

Mimi went as Sven the reindeer (a close win over a rock troll). I already had a brown furry cape so she paired that with some brown pants, a black turtleneck and inflatable antlers (the fuzzy ones looked really straggly, plus these were cheaper). Of course her costume wouldn’t be complete without an “Official Arendelle Ice Master and Deliverer” medal, so I found a glittery snowflake and hot glued it to some leftover maroon ribbon from Daddy’s costume to make it a necklace.

How to DIY your own Frozen Kristoff CostumeMy husband’s costume was the only one that required sewing but it was still fairly simple. He used his own gray twill pants an Bogs boots to finish off the look.

HOW TO: I started by pinning the grosgrain ribbon around the collar and v-neck of the shirt/tunic. Then I added a stripe across each shoulder, following the existing seam. I didn’t have a thicker piece of ribbon, so I laid 2 about 6 inch long pieces of my 1.5 inch wide ribbon side by side down the front of the shirt from the point of the v-neck and sewed everything down. Next, I cut out a V shape from the bottom right side of the tunic and pinned faux fur along both sides of the V and around the bottom hem. I pinned and sewed faux fur around both arms and the neckline – but not all the way to the center of the V-neck – leave an inch or 2 free of fur there. I don’t think you can even tell in the picture above that I left that empty space in front, but, trust me, his chin would have been swallowed by fur otherwise (it also helps ensure he can pull the shirt over his head – see below).

Quick tip: I found out that sewing trim onto jersey material is hard; if you pull too much, it’ll bunch and if you pull too little, the sleeves might be too tight to get on. To solve this, I sewed 3/4 of the way around and left the a big tail at the underside of the sleeve. Then I had my husband try on the shirt to make sure his arms fit in and just did a quick tack stitch by hand to connect the fur pieces and cover the empty section. Faux fur is so forgiving, it was completely unnoticeable.

Frozen Anna Boots After Tantrum
P.S. This is what happens to the boots after they’ve been worn during an epic, probably candy-fueled, tantrum. Next time I’ll add some sort of mod podge or sealant or something over the top of the glitter glue. But it was good while it lasted!
How to DIY your own Frozen Costumes for a Family
HAPPY HALLOWEEN!

Back to School with Starbucks Fall Blend

I’d say we’ve enjoyed some beautiful Fall weather this last week… except that it’s technically still Summer! But I guess that’s what happens when you transplant yourself an extra 300 miles further north. Life has been more than hectic these last few months – from the normal tensions close quarters bring while we stayed with family during our search for a house, to all the craziness and paperwork that goes along with finally (finally!) closing on a place – I’m a little surprised we (and all our stuff) survived. But here we are – a month and a half into our new house, almost unpacked and happy.

However, winter is coming and we have now entered the world of no public transportation. A place where my Grandmother’s old tease that she walked to school in 8 feet of snow, uphill both ways, might be closer to reality. Prior to moving to Northern Vermont, I always had easy access to light rail, subway, commuter train or bus service. Now? I’m a newly re-licensed (but out of practice) driver. So, although my oldest child has reached preschool age and there are many really wonderful preschools within a 20-30 minute radius from our semi-rural home, I’ve decided not to enroll her this year, partially because I haven’t had any practice driving in winter conditions. Home school is probably better than possible death. But, of course, that doesn’t mean we can’t participate in the Back to School spirit!

When I was younger, going back to school always meant shopping (haha, a shopaholic is born) – I loved picking out my new art supplies, folders (Lisa Frank, anyone?), notebooks, a pencil case, a backpack and always a special first day of school outfit. So although we’re overflowing with arts and craft paraphernalia, I made sure to let O pick out a brand new notebook in her favorite color.

But until now I didn’t realize I no longer had a Back-to-School/ beginning of the Fall tradition except a vicarious one. Happily, Starbucks has come to my rescue once again with a limited edition Fall Blend coffee. Wait, a coffee I can only get when the mornings turn crisp and only right before the leaves begin to change color? What a wonderful cue. And unlike the spiced apple ciders and pumpkin lattes I look forward to every year but can only drink sparingly, the medium roast Fall Blend is a cup for every day (until the Holiday and Christmas blends come out, of course ;).

My standard excuse for my coffee habit is that it wakes me up and helps me deal with my little noisemakers who are inevitably bouncing around way earlier than they should be. But these days are not going to be around forever – this blog post made me think about the fact that my little girl is going to be out of the house for half the day almost every day next year when she starts Kindergarten. So even though this may not be a chalkboard sign milestone year, anything that enhances my memory and enjoyment of these precious once-in-a-lifetime moments with my children, even if it’s just a random Tuesday in September, well, that’s excuse enough for me.

STBKS Fall blend

I was lucky enough to be sent product to sample from Starbucks. However, the comments and opinions expressed in this post are completely my own. I was not paid for this blog post.

How Starbucks Spring Blend Saved My Life – Or, Moving 300 Miles Away

spring stbks collage 2

I’ll always remember what we did this Spring because we moved from New Jersey to Vermont… and we only had 11 days to do it. My husband had applied and interviewed at a few different places and we were waiting to see if any of those jobs would pan out. We had already gotten permission to do a 6 month extension on our lease, just in case, but once we got the offer for this job in Vermont, it was now or never. Eleven days is almost 2 weeks – totally do-able, right? I don’t think any of us actually believed we were going to go through with the move though, because we didn’t pack a single box until that day.

Not only did we wait until the last minute, we also have 2 young children who made packing nearly impossible during daylight hours. I don’t know how many boxes were unpacked while I was distracted elsewhere and how many times children had to be evicted from box houses (and other newly empty structures) before I realized it was much more productive to pack after bedtime (which luckily isn’t too late at 7 pm). Even so, the adults were up until midnight or later on most nights.

It’s probably not surprising that this adventure involved A LOT of coffee. With fortuitous timing, to say the least, I received a bag of Starbucks’ 2014 Spring Blend to sample! But, since images of us drinking the coffee would also include bleary eyes, no make-up, messy hair and ragged, not-afraid-to-get-dirty clothes which just shouldn’t be broadcast online for all of eternity, instead I give you…

Oren in bookcase collage 2

Only because I received my coffee sample right before all this chaos started, I can tell you that Starbucks’ 2014 Spring Blend is delicious. (By the end of the move, all I could have said was that it was hot and caffeinated). I’m not sure I tasted the chocolate or sweet orange undertones, but I was surprised that the few sips I savored were light enough for my palate, even with this blend being described as a medium body (I generally favor breakfast and other blonde blends). My husband, who is drawn to dark roasts, also enjoyed it. Of course – the one coffee we can happily share is only available seasonally, haha. Coffee can be stored for a long time in the freezer, right? (– looking it up now.)

The day we loaded up the rental truck, New Jersey decided to punish us for leaving with monsoon rain all day and all night. (Worst move ever!!). But the following morning, like an omen of a happy future, we were greeted with nothing but sunshine. We fueled up with more coffee for the 6 hour road trip and it was blissfully uneventful. I would have loved to pair my drink with buttery shortbread and early harvest berries as Starbucks suggested, but unfortunately, I was at the mercy of the convenience stores’ inventory, and it was more like peanut M&Ms and cheese sticks. Luckily, the taste of the coffee didn’t suffer from the lack of sophistication. :)
vermont blog collage big
And now we’re in Vermont – getting to know the people and the area. Most of the trees were still bare when we arrived, but it only took about a week before birds were singing and flowers were blooming (tons of dandelions). I don’t know if my kids will remember ever living in New Jersey, but I will. This is the Spring that we moved 300 miles away. And maybe every Spring hereafter, when the snow completely melts and there’s no threat of it coming back, I’ll sit on my front porch with a cup of Starbucks Spring Blend coffee and thank god I won’t have to move again for a long, long time.

Save

Save

50 Reasons to Move from NJ to Vermont

This list is, in part, courtesy of my sister who started a campaign to get us to leave New Jersey shortly after her arrival in the Green Mountain State with her husband. I’ve linked to proof of my statements and other interesting factoids so click on a few if you’re curious (especially the one about the serious maple syrup pride).

Drumroll please…

  1. You can see more than 5 stars from your backyard
  2. Burlington, Vermont was named by Parenting.com as #2 in the Top 10 Best Cities for Families in 2012
  3. Ben & Jerry’s!!! (almost got the #1 spot in my list, haha)
  4. No sales tax in Vermont when ordering online (at least for now from Sephora and Amazon)
  5. Second healthiest state in the US
  6. Sugar on snow in the winter from a maple sugarhouse and…
  7. Serious maple syrup pride statewide
  8. Kid-friendly Shelburne Farms with farm animals and activities
  9. WalletHub ranked Vermont 3rd best in its list of “The Best and Worst States for Working Moms” (NJ was 15th)
  10. Kid-friendly indoor waterpark at Jay Peak Resort (indoor= instant vacation in the middle of winter!)
  11. The Northern Lights!!
  12. The Fairbanks Museum and Planetarium (got a Groupon deal for a years family membership for less than the price of regular admission for 1 trip with my family!)
  13. Rated the 5th Happiest State in the nation in 2013
  14. The Stowe Recreation Path
  15. Breweries: Magic Hat, Long Trail, Harpoon
  16. Not one but two Hot Air Balloon Festivals: Quechee and Stoweflake
  17. Montpelier, Vermont is the smallest U.S. state capital and the only one without a McDonalds.
  18. There are more than 100 covered bridges in Vermont
  19. Lake Champlain Ferries (I see the appeal, but I find it terrifying)
  20. Champ, Vermont’s own Loch Ness Monster of Lake Champlain (this is adorable though!)
  21. Billboards are illegal
  22. Vermont is the 5th most educated state of 2013 (ahead of #6 New Jersey)
  23. The Vermont high school graduation rate is roughly 90 percent – one of the highest rates in the nation. And highly rated schools overall.
  24. Leaf Peeping season
  25. Walk the trail to Quechee Gorge
  26. Cleaner air  (Fine. I guess we won’t miss the garbage smell on the way to Newark Airport)
  27. Traffic and rush hour are almost non-existent (especially when compared to NJ/NYC)
  28. About 2 hours from Montreal, Quebec, Canada
  29. Lots of farmers’ markets and artisan/craft fairs
  30. Cutest ever trick or treating event for little kids, Halloween morning on Church St.
  31. Open Community swimming pools (unlike residency-required pools in NJ too full to even accept new membership)
  32. Cut your own Christmas tree farms
  33. Movie theaters where you don’t have to buy tickets in advance
  34. The King Arthur Flour company (the bakers out there will be excited with me!)
  35. The Vermont Solar and Small Wind Incentive Program (cool)
  36. Legal same-sex marriage since Sep. 1, 2009 (I definitely want to live in an open-minded, liberal state)
  37. VT Restaurant week
  38. For my husband: fishing!
  39. No IKEA. :( Which makes anti-materialism the pro here. Kind of.
  40. It’s possible to house livestock in your backyard (my husband has always wanted chickens)
  41. Getting away from the Blue Laws in Bergen County, NJ (practically nothing is open on Sundays)
  42. Just look at these beautiful pictures (from Buzzfeed)
  43. The Green Mountain Reiki Institute (for my mom who had enormous success using Reiki in treating her migraines).
  44. Skirack‘s Annual Bike Swap (one person brought in 34 bikes to swap/sell and there were a number of people with 10+!)
  45. For my husband: there IS a Five Guys in South Burlington
  46. You’ll see stories about baby moose roaming around the city in the local newspaper
  47. And the newspapers write stories about helping turtles, frogs and salamanders cross the street, if it’s safe to do so. (FYI to self: look up how to identify a snapping turtle and DO NOT TOUCH!!!)
  48. Mandatory composting
  49. Getting out of a super expensive area! Forbes magazine’s 2012 Most Expensive ZIP Codes in the United States list included 12 Bergen county municipalities in the top 500. (And in 2013, Alpine, NJ, a Bergen county city, was #8). Yikes.
  50. Your husband gets a great job offer…

We’re Moving to Vermont!!!

Terms of Bedtime Surrender

giraffe-bedtime-terms editedSometimes bedtime goes smoothly but other times my daughter claims it simply isn’t possible for her to sleep, close her eyes or even breathe without someone else in the room with her. After exhausting the classic, surefire stalling tactics: I need water, I have to go potty, my tummy is exploding (hungry), I finally got this bedtime request last night:

“Mommy, will you make a surprise for me for in the morning?”

“Will you go to sleep now if I make you a surprise?”

“Um, yes.”

“Ok, what kind of surprise?”

“I want you to draw me a picture of a giraffe. With hearts on it. And say Love O.”

“I would be happy to do that for you.”

“Ok, can you do it right now? Go get the crayons and white paper and sit at the table.”

As I backed out uncertainly I said, “Ok, I’ll go right now. Good night, I love you.”

“Ok. Do it right now and I’ll go to sleep.”

She said it. And I didn’t hear another peep.

If this became a tradition and actually helped her go to bed at bed time, that would be amazing. I’m going to ask her if she wants a surprise picture next time she doesn’t want to go to sleep. Fingers crossed. (Luckily my artistic abilities don’t seem to be a deciding factor either, haha.)

I’m a Guest Blogger – E-Time Rules (in both senses)

Creative Geekery is doing a series on Screen Time Rules (how different families manage television and other forms of digital entertainment in their families) and I am so thrilled to be her first guest blogger! Come read how the ThinkerMommy family allots E-time here:

http://creative-geekery.com/family-screen-time-rules-thinkermommy-com-style/

Warning: we do sometimes exceed the AAP’s recommendations for E-time.

Random picture found on my iPhone after O had played with it

Found on my iPhone after O had played with it