Our DIY Frozen Halloween – Family Costume How To

Disney Frozen Halloween Costumes How To - Olaf and Anna

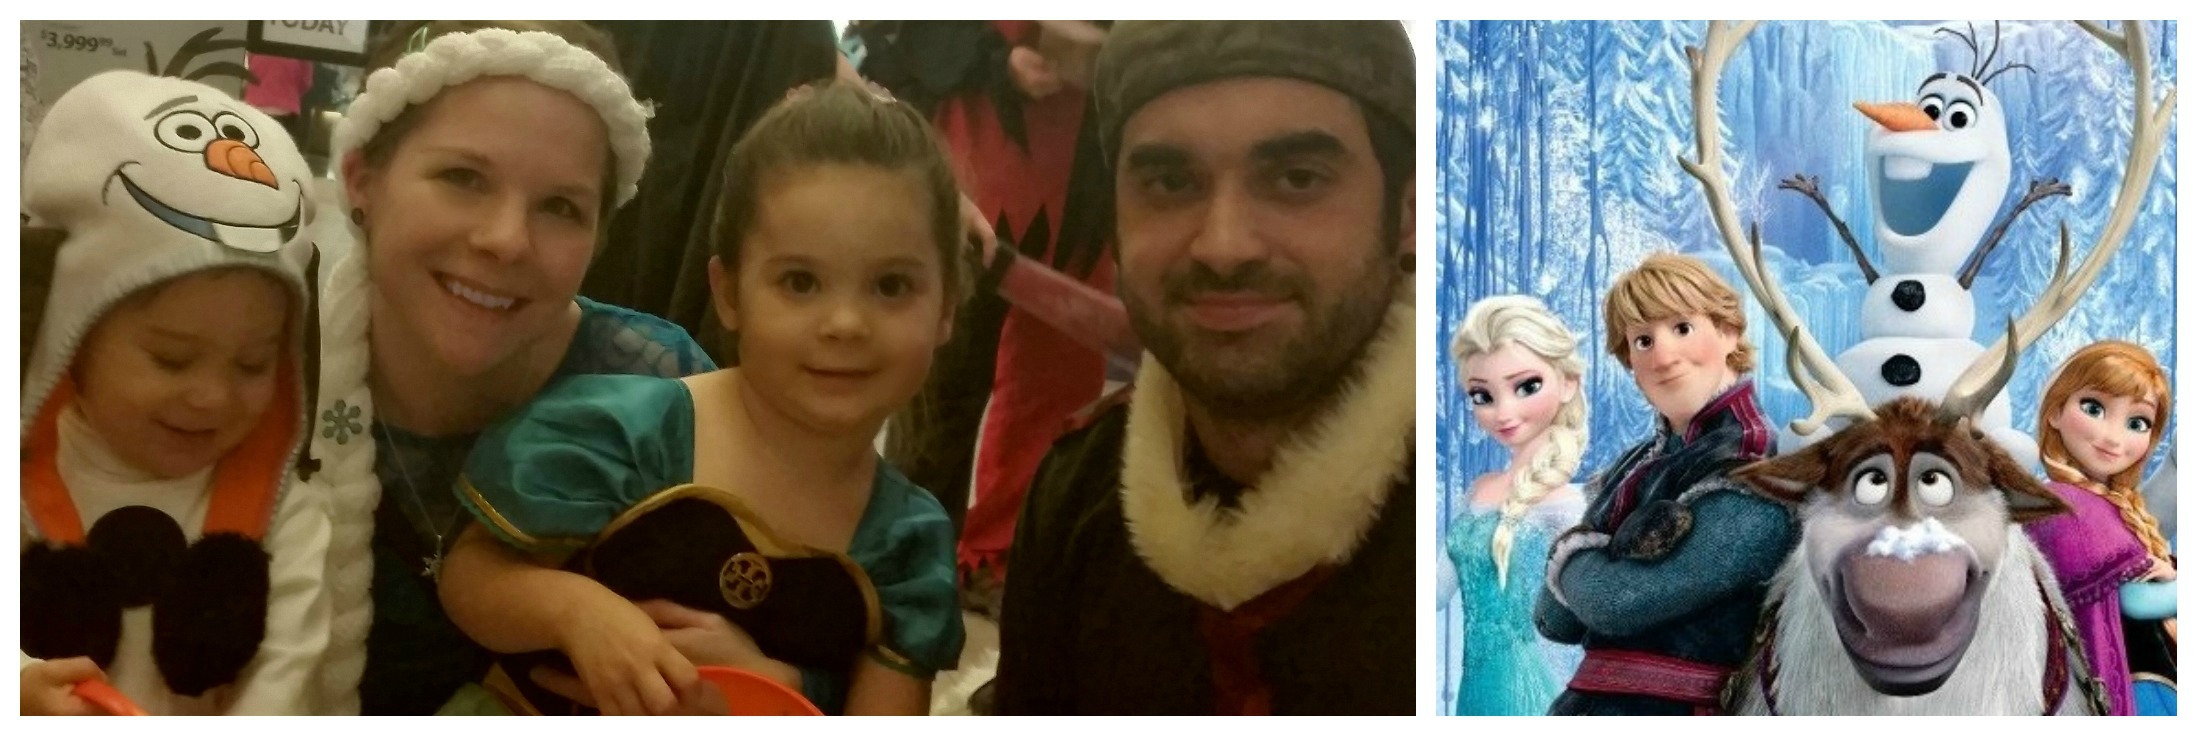
My daughter (along with half the kids in the US) decided she wanted to be a character from Disney’s Frozen movie this Halloween. After she made the big decision of which character (Anna) and we negotiated how the rest of the family would fit in (“Nobody is Hans because he’s a bad guy.”), I got down to the business of assembling our costumes as a mixture of bought (mostly at Old Navy with coupons!) and DIY pieces (because I do not have time to learn to sew dresses!).

Here is my do it yourself process:

How to DIY your own Frozen Anna Coronation Hair Ribbon

I fell in love with Anna’s Coronation outfit (which I found cheap on eBay direct from China) and convinced O to go along with the green instead of Anna’s typical snow travel ensemble (which involves a dress AND a cape). The hairpiece was the easiest part and I think it allowed us to not have to totally copy Anna’s intricate ceremony hairstyle (we just slicked her hair up in a bun instead).

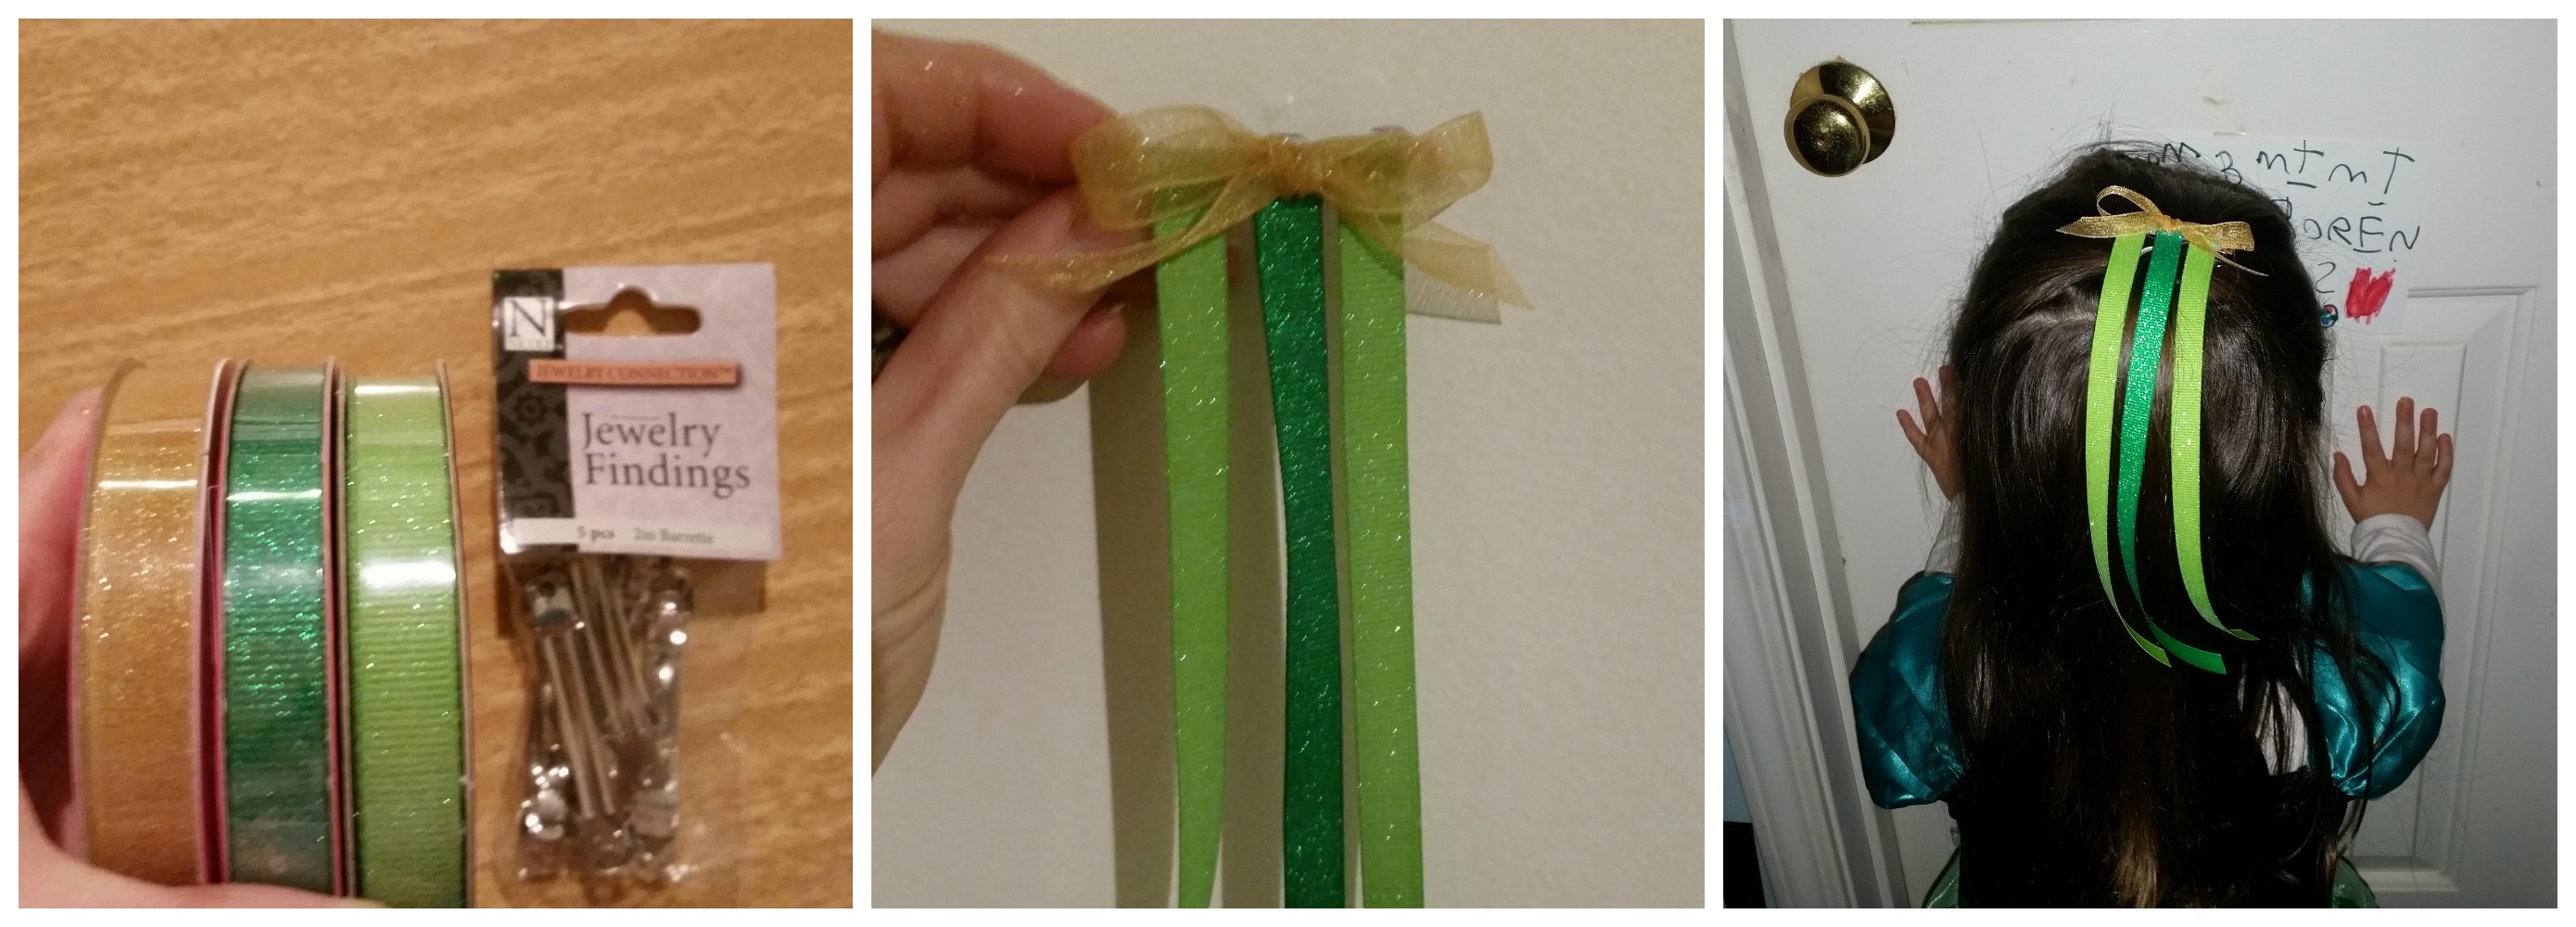
HOW TO: For her hairpiece we picked out 3 sparkly ribbons: a light green, a dark green and gold. I cut pieces of equal length from each and hot glued them to a barrette (from A.C. Moore). Then I tied another piece of gold into a bow and hot glued just the back of it to the barrette (tip: put your fingers in the bow loops as you glue so the tops don’t get stuck  or your clip will look smooshed). Easy!

How to DIY your own Frozen Anna Boots
Although technically Anna wore more formal shoes to the coronation, it’s getting pretty cold over here, so function won out (plus my daughter needed some fall/winter transition shoes). Luckily, she was okay with it because these boots are clearly featured in the movie during Anna’s visit to Wandering Oaken’s Trading Post & Sauna. I picked out The Children’s Place Ryder Boots to decorate.

HOW TO: I printed a picture of the costume boots from The Disney Store to use as a guide. Then I sketched out my design in chalk (you can easily wipe chalk mistakes off faux leather like this with a damp cloth or finger). I started out with Fun Paint Glitter Glue in gold but the applicator tube was too big and I knew all my lines were going to run together. Then I tried Martha Stewart’s brand glitter glue in lemon drop (pack of 16 assorted colors on clearance at A.C. Moore!) which had a perfect, long thin applicator but the yellow turned green on the black boots. I had to empty the Martha Stuart glue and replace it with the gold in her small tube but then I just traced my design and let the boots dry overnight.

How to DIY your own Frozen Elsa Hair Crown Braid
If my daughter is Anna, you know Mommy has to be Elsa. Since I have a pixie, I knew I’d need faux hair for Elsa’s signature over the shoulder single braid. Doing just a braid crown took less time than crocheting an entire hat and attaching the braid and I think it turned out pretty good!

HOW TO: First measure loosely around your head and down your shoulder to where you want your braid to fall and then double that length (I probably also added a few extra inches to be safe – better too long than too short). I picked a white yarn with some sparkle and cut about 200 pieces that size. Yes, it will be tedious, but turn on a movie and you’ll get through it before it’s over. Tip: make sure you lay your pieces of yarn out so that the ends on one side are lined up (doesn’t have to be exact) to save time and frustration later. Next, holding all your cut pieces together, tie a knot at the lined up end and stick it under something heavy (I put it under my laptop). Comb through the yarn with your fingers to make sure it’s not tangled (take your time!), divide it into 3 sections and braid. Use a large hairband to hold the end of your braid temporarily.

Find the center of your braid and hold the center up to your forehead. Wrap the ends behind your head so that it feels comfortable but not too loose (remember the yarn will stretch) and tie that permanently. I used two of those tiny rubber band hair ties (since they always break). Now, unbraid your 2 tail ends and re-braid them together into a single braid. Secure the end permanently and trim your ends even.

There are lots of ways to decorate your Elsa hair braid and I thought about getting some sparkly snowflake jewels but when I stumbled across these paper snowflakes in the scrapbooking section of A.C. Moore, I knew I wasn’t going to find a better deal. Put 2 aside for your shoes and hot glue the rest to your braid.

Perfect to DIY your own Frozen Elsa Costume
I already owned a blue skirt and I found this very Elsa-looking top on Amazon for $10!!! I decided to do without the cape (partially because somewhere inside I was convinced my daughter would change her mind at the last second and steal my costume identity) but I did buy some rhinestone stickers for $1.99, also from the scrap-booking section at my local craft store, and my 4 year old had a blast sticking them to me. Yes – they fell off all over the place but she went a little overboard so I had plenty to spare. :)

How to DIY your own Frozen Elsa Costume Shoes
I kept 2 snowflakes leftover from Elsa’s hair and hot glued them onto some teal blue Sueded Pointed Toe Flats from Old Navy. These are another totally different shade, but at least all the pieces of my costume were blue, right?

How to DIY your own Frozen Costumes for a Family - Olaf and Sven
For my son’s Olaf costume, I decided to plan everything around the hat but so many of them were kinda scary looking I was relieved to find this Disney Frozen Flipeez Olaf Hat on Amazon. From there I had planned to put him in just a big, cheap white sweatshirt but I couldn’t find any anywhere! I thought I might have to settle for like 3 layered white shirts for warmth when I noticed a shearling lined brown jacket in the Toddler department. Turned inside out, those unlined brown arms become instant sticks and I have my (off) white snowman. Oh, except there was brown down the center for the zipper too – so I actually had the jacket inside out and backwards. My little guy didn’t seem to mind one bit though. Circles of sticky-back black felt were used as faux buttons and easily covered the interior jacket tag. The best thing about this costume is that I can use all the pieces again later throughout the winter – no waste! :)

Mimi went as Sven the reindeer (a close win over a rock troll). I already had a brown furry cape so she paired that with some brown pants, a black turtleneck and inflatable antlers (the fuzzy ones looked really straggly, plus these were cheaper). Of course her costume wouldn’t be complete without an “Official Arendelle Ice Master and Deliverer” medal, so I found a glittery snowflake and hot glued it to some leftover maroon ribbon from Daddy’s costume to make it a necklace.

How to DIY your own Frozen Kristoff Costume
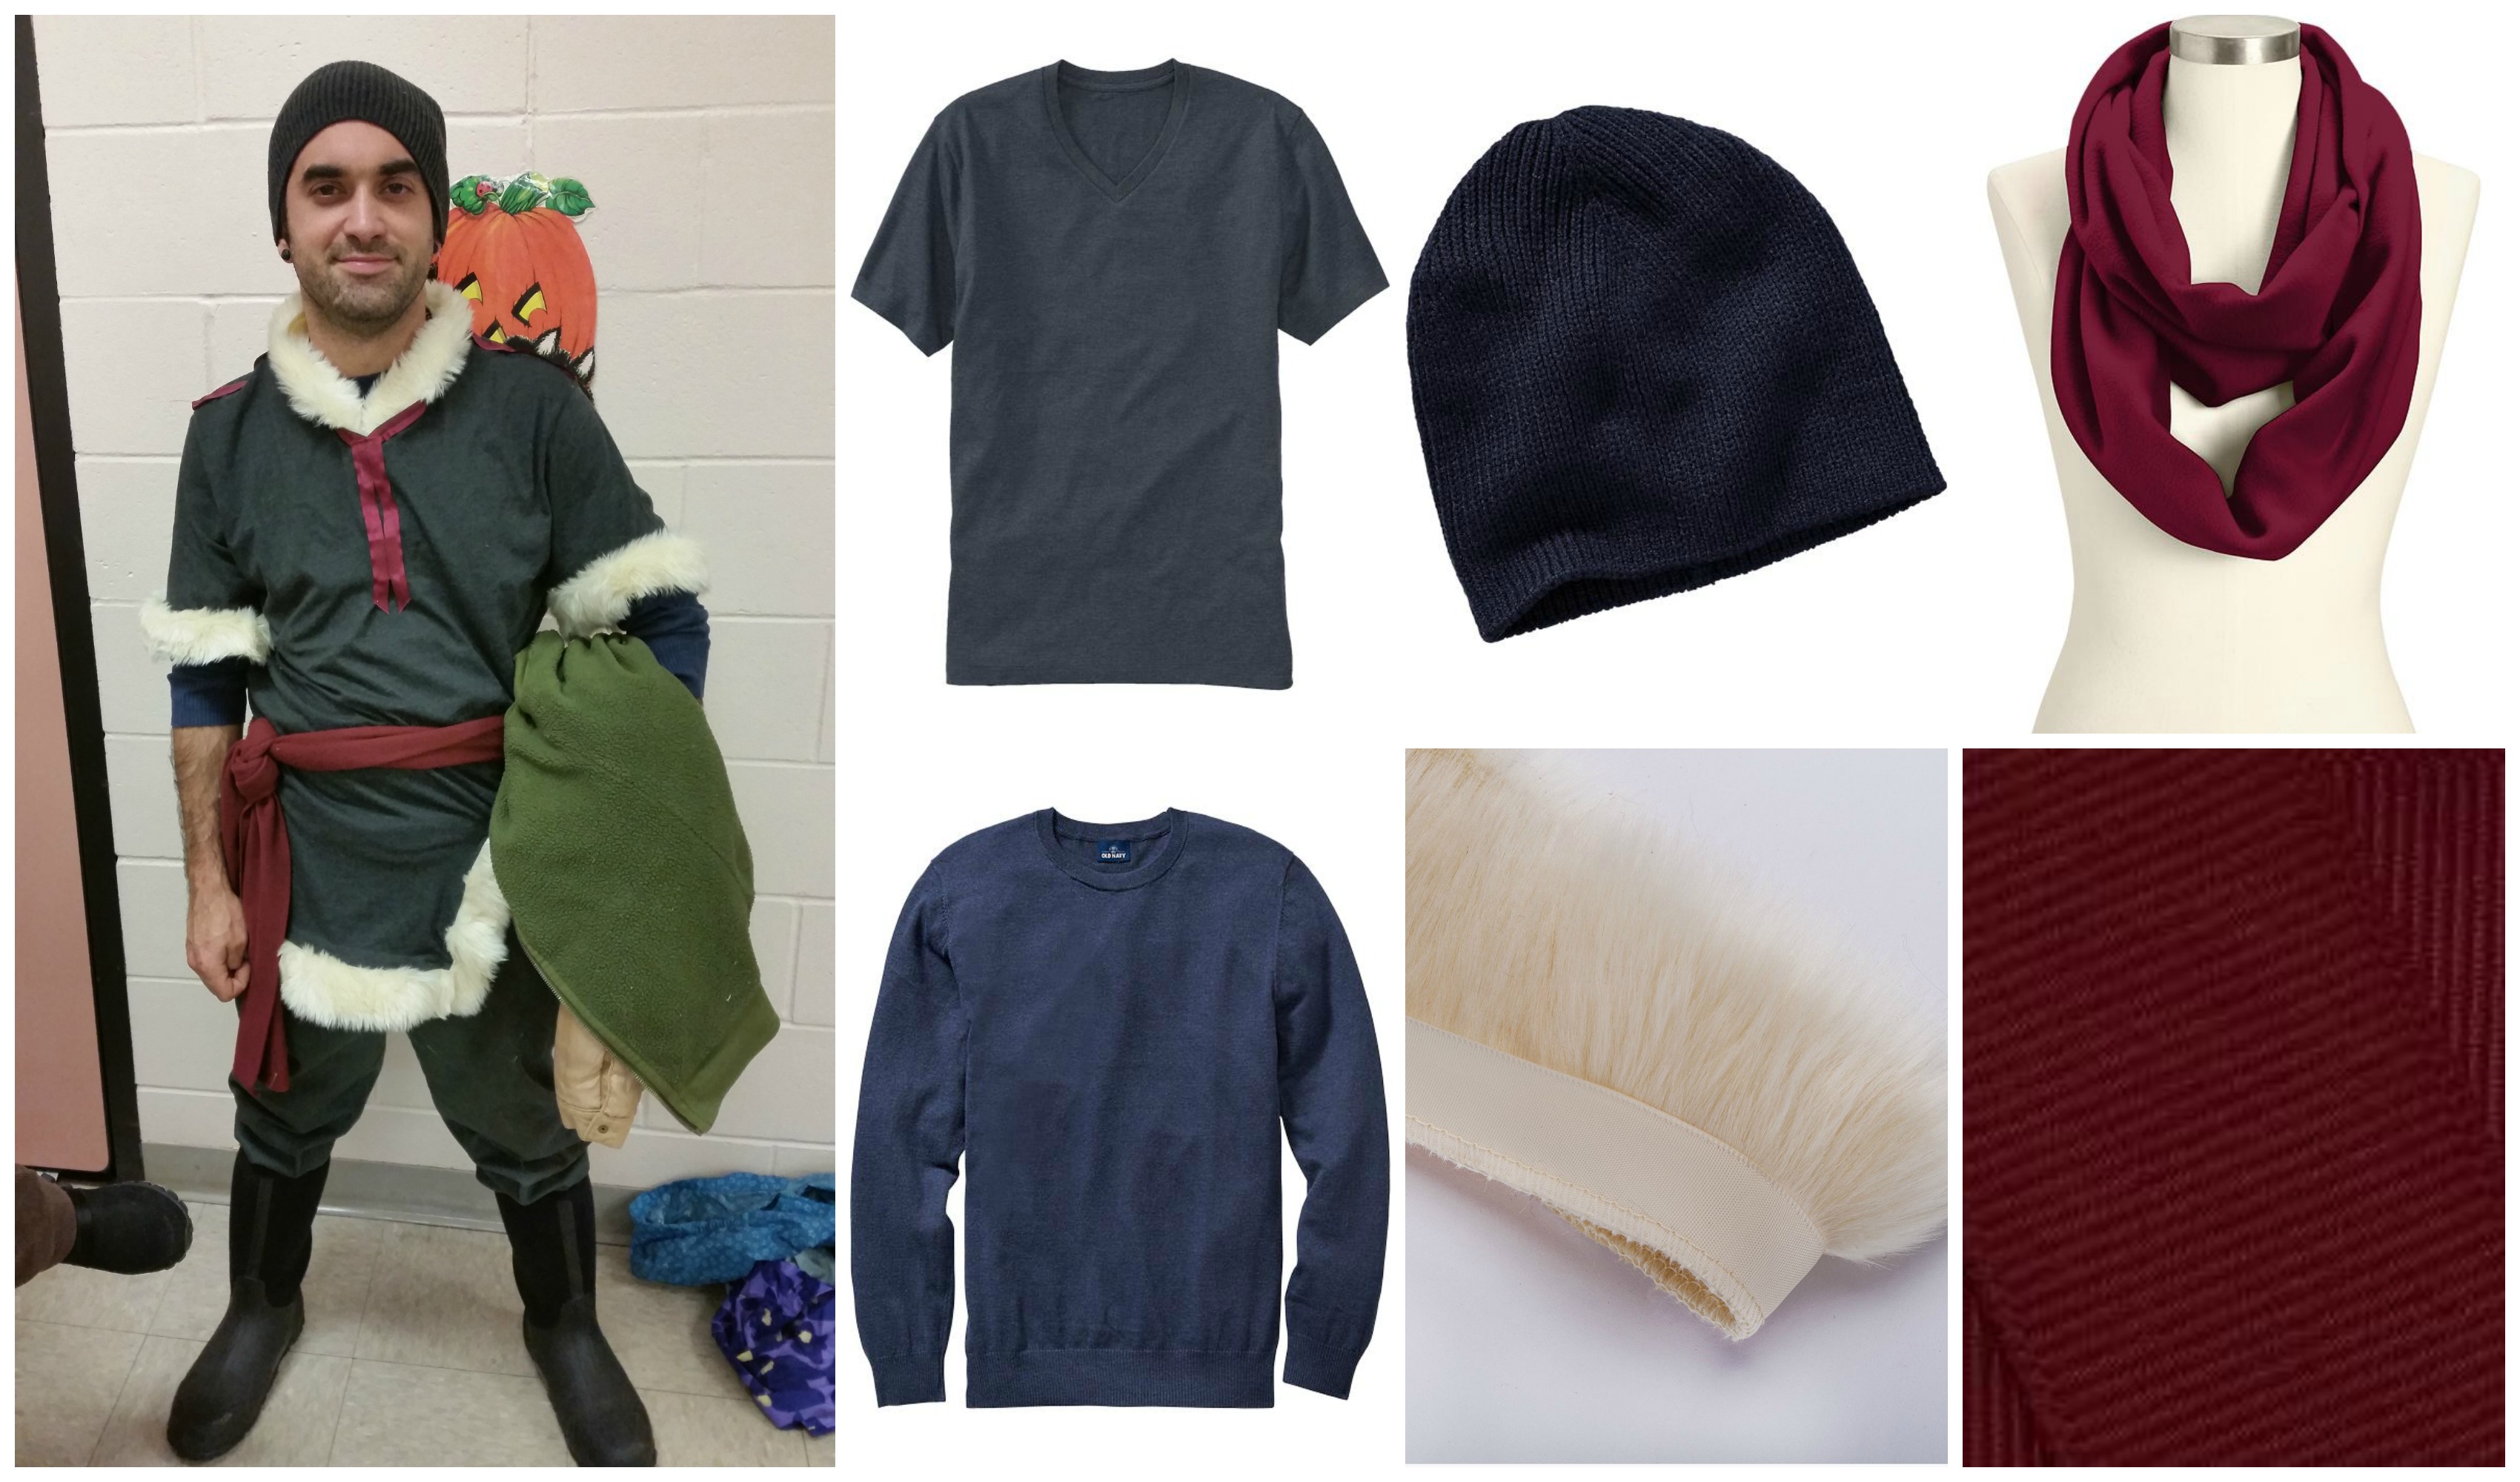
My husband’s costume was the only one that required sewing but it was still fairly simple. He used his own gray twill pants an Bogs boots to finish off the look.

HOW TO: I started by pinning the grosgrain ribbon around the collar and v-neck of the shirt/tunic. Then I added a stripe across each shoulder, following the existing seam. I didn’t have a thicker piece of ribbon, so I laid 2 about 6 inch long pieces of my 1.5 inch wide ribbon side by side down the front of the shirt from the point of the v-neck and sewed everything down. Next, I cut out a V shape from the bottom right side of the tunic and pinned faux fur along both sides of the V and around the bottom hem. I pinned and sewed faux fur around both arms and the neckline – but not all the way to the center of the V-neck – leave an inch or 2 free of fur there. I don’t think you can even tell in the picture above that I left that empty space in front, but, trust me, his chin would have been swallowed by fur otherwise (it also helps ensure he can pull the shirt over his head – see below).

Quick tip: I found out that sewing trim onto jersey material is hard; if you pull too much, it’ll bunch and if you pull too little, the sleeves might be too tight to get on. To solve this, I sewed 3/4 of the way around and left the a big tail at the underside of the sleeve. Then I had my husband try on the shirt to make sure his arms fit in and just did a quick tack stitch by hand to connect the fur pieces and cover the empty section. Faux fur is so forgiving, it was completely unnoticeable.

Frozen Anna Boots After Tantrum
P.S. This is what happens to the boots after they’ve been worn during an epic, probably candy-fueled, tantrum. Next time I’ll add some sort of mod podge or sealant or something over the top of the glitter glue. But it was good while it lasted!
How to DIY your own Frozen Costumes for a Family
HAPPY HALLOWEEN!

How to Recycle Your Old Changing Table

We stopped using my daughter’s changing table around the time she started wearing pull-ups, but we kept it for months afterwards because it was working well enough as a mini dresser. The bins were easy for her to access and the socks & undies drawer underneath the pad was high enough to keep little brother from pulling everything out over & over again (his favorite game elsewhere). But that big open space on top was WAY too convenient – it was a magnet for junk, so I knew we had to get rid of it. It was also time O got a real dresser anyway – those bins were looking smaller and smaller every year. (P.S. I took the picture below after I had already started trying to peel off the reusable stickers – there used to be 2 on the drawer as you can probably tell. There was also a third bin on the top shelf – snatched by a child at picture time – and a soft green minky changing pad cover that looked really nice all together).

changing table before

The Changing Table: Before

As you may remember (and if not, click here), our changing table already went through one small transformation when we painted it white. So I was all ready to give it a touch-up and find someone else with a new baby who could use it. But once I took the pad off, I noticed that we must have exceeded the weight limit at some point because the wood base underneath the pad was totally cracked and near collapse – scary! The drawer was also in worse shape than I thought (probably from rough toddler handling), so I was resigning myself to having to throw the whole thing in the trash when my husband came up with a brilliant idea…

The Changing Table: After

The Changing Table: After

Yeah, he cut it in half; and it literally took less than 1 minute with a power saw. Now we have a brand new coffee table/ train table (which coincided well with a certain Christmas gift) which has a handy rim to prevent rolling vehicles from escaping AND storage underneath for toys. Since our previous outside-the-bedroom storage solution had been a giant tupperware bin (which you can actually see in the photo below), I was very happy with this new upcycle. The giant bin would have fit underneath the new coffee table, but we thought the smaller bins would cause less frustration (and, fingers crossed, less mess) when the kids are seeking and removing other toys. I am still on the hunt for prettier bins though – the green and blue bins we previous had there (which I like a lot more) were moved to the top of O’s new wardrobe since they match her room really well.

changing table collage

Coffee Table: hideout and butt elevator? yoga positioner?

My son obviously has other ideas about the new changing table coffee table. (And no, he didn’t fall. He crawled off the edge, positioned himself as so and stayed that way for about 5 minutes). Whatever makes him happy. :)

I was hoping to turn the top half of the changing table into something; it was too big for a doll bed, possibly a play kitchen somehow? But due to space constraints, weather too cold to work outside in, and the already damaged frame, although I was sad to do it, we had to throw out the top. However, if you do something similar and come up with a good use for the top half of your old changing table, I’d love to see it!

Until next time, Happy New Year everyone.

Planning our Itsy Bitsy Spider First Birthday Party

spider label collage watermark

Unbelievable. It’s almost time for Number 2 (aka Oren)’s first birthday. I admit I used to roll my eyes a little every time someone said it with a nostalgic sigh, but one day it’ll hit you – the time really does fly! Funny thing about time though: when you’re looking forward to something it can move faster or slower depending on what you don’t want it to do. Ten more minutes until the school bell rings takes forever because you want the day to be over. But I’m so excited to be planning this party and loving every minute of it and then all of  sudden I’m like, “Wait… what?! It’s already Thursday?!! I only have how many weeks left?!”

Anyway, Grandpa in California decided he wanted to throw the big 01 party this year and we needed to check off a long-overdue visit on our end, so that decided things quickly. Nana Mark’s monster theme is going to be spectacular but I obviously don’t want to miss out on a second opportunity for cake… I mean, I don’t want to miss out on having a party with my east coast friends masquerading as a party for my one year old who won’t even remember it (except in pictures – which is what I have to keep reminding my husband to prevent it from turning into a lame single balloon and sheet cake type of event). So… we’re having 2 birthday parties; bi-coastal celebrations!

P.S. Since I’m so cool to be having an east and west coast party for my son, I’m also going to pretend to be a movie star as we schlep car seats, a stroller, diaper bags, gobs of toys, suitcases, 2 children and god knows what else through the airport. I’m pretty sure all I need is a funky new infinity scarf, big sunglasses, new books on my Kindle and a secret Godiva stash. I have an excellent imagination.

The Itsy Bitsy Spider theme for the east coast party came about because it’s the first song that ever really caught Oren’s attention – stopped him from squirming on the changing table or fussing while getting into a car seat – and it became a favorite. Unfortunately, the minute we stop the song he usually goes into hysterics, so there have been some memorable never-ending musical adventures. Plus spiders are cool (and my 3 year old is totally into bugs right now – every time we go outside she tries to force an ant to hitchhike on her hand to destiny unknown).

Sorry this post has serious ADD! Anyway, when I started buying things for the party, I realized that most of the adorable shops I love that sell printable invites, etc., didn’t offer Itsy Bitsy Spider themed items. For such a popular nursery song, I was really surprised. Most of what I could find was in Halloween oranges, purples and black – not the happiest colors. But I had already fallen in love with the spider idea and nothing else seemed right for Oren.

So, I made this Pinterest board and decided to emphasize the “out came the sunshine” and “down came the rain” parts of the song. First, I made the color scheme bright blue and yellow – nice, happy colors for a little boy’s birthday party. Then, I focused on those 4 visuals: rain, clouds, sun, spider (I’m pretty convinced there’s no way to make a water spout look good on anything but the invite). There are actually lots of “You are my Sunshine” themed party printables so I tagged a few as something I might be able to use with slight alterations (just add spider, right?). But eventually I decided to enlist the help of a talented graphic designer on Etsy to design something original and adorable for me. Etsy has this great feature where you can request a custom order from sellers that are willing to do accommodate them – so no matter how crazy your idea, someone out there will probably help you make it happen. Luckily my idea wasn’t so crazy (for once).  ;)

Here’s what Mia at thepartyfairydesigns on Etsy, came up with for me (also pictured at the top of this post):

spider party xtra collage watermark

clockwise from top left: invite, t-shirt iron-on design (!), treat bag toppers, party hat

And this is just a VERY small part of what I got for only $32 ($12 for the invite and $20 for the rest of the custom party package). Mia even made me a personalized coloring book page for Oren and his little guests, a welcome sign, a custom happy birthday bunting, and more. Click here to see the amazing amount of stuff she’ll make for you in a custom party package.

So the decor is mostly done, just need to do some printing and cutting, buy a tablecloth, plates, streamers and such. Now I can move on to trying to figure out what we’re going to serve our guests to eat. I give Mia total credit for coming up with rainwater as a beverage idea (and I’ve got a cool label to go with it) but I’ll need a bit more than that. Wish me luck! And please, comment if you have any ideas – I’d love some suggestions!

Orange Butterfly 3rd Birthday Party – Part 2

birthday countdown collage 2

construction paper birthday chain countdown

To start off O’s birthday celebration, I found this awesome idea for a paper chain countdown from Big Day Chains. Due to my extreme procrastination, I didn’t have time to order one from them and had to DIY a version for myself, but if you can, I highly recommend ordering from Big Day Chains – their printed version is super adorable, can be colored by the birthday kid on one side and comes with a commemorative card for the scrapbook. O LOVED tearing off a chain every day (I recommend adding a little pre-tear to the day’s chain link before your child gets to it if they’re younger or just a really enthusiastic ripper or else you might need to keep scotch tape handy for repairs).

Moving on to the party planning. We decided to do an orange themed party with butterflies this year. I wrote a little about my ideas in a previous post here. But when I showed off my cake idea, my husband, mother and multiple friends all vetoed fondant (really? you want the cake to look good and taste good? geez. haha). So, the cake design had to be changed. I also found some amazing edible butterflies from SugarRobot on Etsy (made from potato starch) that I just had to use (originally I was going to put 3 frosted butterfly cookies on the cake).

Originally I was also thinking of doing an orange and blue color theme, but I realized that finding the exact shade of blue I wanted was probably going to take some special ordering. Since I wanted to stay on budget, I decided to change the party colors to orange and pink instead. Every store with party supplies has at least 2 shades of pink stuff, a pastel and a hot pink – so that made stocking up on basic things like balloons, streamers and utensils from the dollar store super easy.

cake design collage

Left to right: the original cake idea, the final cake design, the party table layout

Referencing my party table drawing above (yeah, that amazing piece of art is all me), I also decided early on that I had to have these adorable glass mason jar sippers from the Acme Party Box Company and their orange striped paper straws. I filled them with Celestial Seasonings Country Peach Passion tea with ice which everyone loved and without a drop of sugar added.

To make the peach iced tea:

  1. Take 6 tea bags and steep with 1 cup boiling water for about 10 minutes.
  2. Then add cold water to fill your pitcher.
  3. Add ice to each mason jar right before serving
  4. Note – other brands of peach tea are not as good.
  5. Note – Do NOT use Celestial Seasonings Peach iced tea – it’s caffeinated black tea with peach flavor added. The Celestial Seasonings Country Peach Passion tea is herbal, caffeine-free, safe for all ages and tastes way better.
birthday morning collage

O discovering her butterflies on the morning of her birthday

On O’s birthday morning, complete with butterfly PJs, we hung a curtain of butterflies outside her room (from Oriental Trading) which she loved (and then had her toy dinosaur eat, haha). We went out for a pancake breakfast and by the time we were done, the weather had warmed up enough to kick everyone outside to play while I set up the house for the party. We bought a bean bag toss and a ring toss from Oriental Trading, bubble wands (dollar store!) and we had a ball pit from last year to bring out too. The bean bag toss was a huge hit with the adult guests by the way.

For food, my former-chef sister chopped up an amazing goat cheese and mixed veggie salad which we paired with this recipe for an Olive Garden copycat salad dressing which turned out fantastic and a fruit salad that I’m pretty sure included every fruit known to man (she even stuck fresh figs in there). We ordered BBQ pizza too for the meat-eaters in the group.

party table collage watermark
Next, the party table. I ordered a strawberry sunrise (love that!) butterfly mobile kit from littledreamersinc on Etsy which took WAY longer to put together than I anticipated, but turned out really lovely (no wonder she charges $75 for the completed versions). I also found some amazing orange buckets with a number 3 on them completely by accident at Michaels and filled them with white and yellow daisies, orange carnations, and something pink – youthful (and, by happy coincidence, cheap) flowers. My amazing sister baked and decorated a bunch of butterfly shaped sugar cookies for us (which was actually what Olyla wanted instead of cake). But we did have cake: one layer of yellow cake, one layer of strawberry cake (from this recipe) with cream cheese frosting and fresh strawberries in the center. (In hindsight, you should never layer fresh strawberries in a cake – it makes things mushy, and even if you layer it between frosting on both sides, the sugar from the frosting will make the strawberries start to leak juice). The mango flavored number 3 lollipop was from the awesome VintageConfections on Etsy.

birthday gifts collage
Normally I wouldn’t show off the gifts my daughter got, but my sister took the prize for most creative wrapping job and I just have to show it off. I was a little worried O wouldn’t want to tear open her robot, but I guess she was just caught up in the paper-ripping moment. All in all it was a spectacular birthday.

outdoor party collage big

Left to right: 1. When told she had to wait for her cousin to finish eating before we could go inside for cake, she responded with the stare down. 2. Oren wanted to celebrate too. 3. Grown guys in pointy party hats is always fun, but that O decided to pass out the “drinks” from the ring toss to everyone was even better.

3rd birthday 077

One more of the cake – cause I love it!


Planning O’s 3rd Birthday Party

This is the outfit she picked today (she's also recently mastered the stink face)

This was today’s outfit choice (she’s also recently mastered the stink face)

I just realized that having complete creative freedom (which I love) over my children’s birthday parties isn’t going to last much longer. Actually, I’m pretty sure this is the last party I’ll be able to dream up all on my own. O is turning 3 in a few months and already enjoys issuing commands and expressing her strong opinions (one of my favorites, complete with finger wag, is “No no no, Mama. No singing!”).

So, even though I have another baby who’s still too young to tell me he doesn’t want to wear the adorable faux suspenders and bow-tie I picked out, I’m sure by the time Number 2’s first birthday rolls around, O will have gained the ability to telepathically communicate his desires for him.

Soon, I imagine I’m going to have to come up with amazing parties based on vague but intense requests like: a big green garbage truck, sparkle magic, flying sharks or tomato soup (I had a nightmare about that last one). But for now I want O’s party to just be a reflection of her personality and interests at this time in her life. Last year I did a moon and stars birthday party because she was obsessed with seeing the celestial bodies every evening on our summertime walks. This year almost spoke for itself. Here’s a list of our most common exchanges:

  • What do you want to wear today? “This orange shirt,” grabbing well-worn Halloween t-shirt (pants are always optional in her book).
  • What do you want for breakfast? “Orange juice.” (repeat answer at all meal times)
  • We’re at the grocery store, what do we need? She points to a package probably containing candied octopus or something equally disgusting and says, “Orange box. In the cart, please.”
  • Here’s your lunch, honey. “Nooooo, orange bowl!!!!”
my rough but awesome cake idea

my rough but awesome cake idea

But, a party just based on a single color seemed a little boring. So, after looking around online for ideas, I found a gorgeous orange and blue party invite that inspired an accent color. And I kept my ears open for any new favorites cementing in my preschooler’s mind. Luckily, (since we’re t-minus 2 months for this party) more inspiration came quickly: O started talking about butterflies randomly and then non-stop. She makes everything from her toy train and pirate to her princess figurine and squeaky frog fly “with the butterflies” during playtime, and at night, if I tell her the butterflies are going to sleep too, it seems to make bedtime easier for some adorable reason. So it’s now officially an orange party with butterflies (Note: not just orange butterflies because in my mind that = monarchs = Halloween colors. I know, I’m difficult).

VintageConfections Large number 3 hard candy lollipop

VintageConfections Large number 3 hard candy lollipop

I’ve (very badly) sketched out a cake idea above – feel free to share your thoughts and ideas. My fabulous chef sister has offered to make butterfly cookies so I plan on showcasing her talents by sticking 3 or 4 on the cake. And, I think the number 3 is going to be a yellow hard candy lollipop from VintageConfections on Etsy (pictured left) – they have so many drool-worthy flavors, I might end up getting more to hoard and eat use as favors.

The rest is still in the brainstorm stage but follow my Pinterest board for more cool ideas as we get closer to B-day.

Ocean Nursery Update 4 – Under the Sea Crocheted Baby Mobile

We had an ocean themed nursery for our first baby, and we’re continuing that theme for our second. Since I crocheted O’s baby mobile, and since I think it’s still comforting for her to have it hanging from the ceiling above her bed (it has been there all her life), I didn’t think it was really fair to cheat baby number 2 out of a mobile of his own. Of course, I decided this way too late so I’ve been crocheting every night until my hands ache. But at least it paid off and I (just barely) made my deadline (yes, I’m hanging the mobile the night before my c-section).

So, first I needed to come up with a new list of colorful underwater creatures that weren’t entirely impossible to crochet. The first mobile had: a lobster, mermaid, humpback whale, octopus and a striped fish. After much debate and pattern searching, I decided on: a sea slug, angler fish, stingray, starfish and seahorse (lot’s of S’s strangely). After deciding on a way to hang the mobile, I ended up needed a few more creatures so I added in a penguin and more starfish (since they were easy and looked good in lots of different colors).

my sea slug

my angler fish

Don’t you love how my sea slug looks like he might also be going to an underwater disco? (I used Martha Stuart Glitter Eyelash yarn). On the angler fish, I used glitter safety eyes from this site and a cool lace for his teeth to make him a little more friendly. The stingray below has pipe cleaners in his “wings” and tail to give them a nice shape.

my stingray

my seahorse

my penguin

my starfish

If you’re crafty-inclined and want to try out some of these patterns too:

  • Sea Slug – $4 pattern from edafedd on Etsy (well written, easy to follow patterns!)
  • Angler Fish – free pattern from Lion Brand Yarn, taken from the book 75 Seashells, Fish, Coral & Colorful Marine Life to Knit & Crochet.
  • StingRay (or Manta Ray minus the mouth flaps) – free pattern from Roman Sock
  • Blue Starfish – free pattern from Lion Brand Yarn
  • Seahorse – free pattern from Mausica’s Magical Menagerie
  • Amigurumi Penguin – free pattern from Lion Brand Yarn

And here are pictures of the original ocean mobile I crocheted for O (email me if you’d like links to the patterns I used for the first mobile and I’ll try to dig them out for you):

octopus (well, pentapus)

whale

lobster

striped fish

mermaid

O’s mobile

The second thing I had to figure out was how to hang the mobile. Ah memories… I remember giving my husband and his work friends the next to impossible task of drilling holes of equal height and equal distance from one another into a large wooden egg for mobile number one. I’m so proud of him for totally pulling it off! But I think he’s already has enough “fun” project memories from this pregnancy, so I wanted to hang this second mobile in a more simple way. I think the easiest hanging options are a wooden cross or a circle or maybe multiple tiered wooden bars (there I go getting complicated again). I found some hanging examples below on Etsy (and, by the way, if you click on the pictures, I linked back to Etsy where you can purchase them):

by LovelySymphony on Etsy

by Yarntoybox on Etsy

by Lovelygiftforkid on Etsy

But, as luck would have it, I came across a gray Pressa Octopus Clothes Drying Rack from IKEA that I’d had lying around the house for a while (it was in my Christmas stocking) and my mom suggested I use that for the mobile… brilliant!!! (and also – duh Nicole!!!). I took off all the clip hooks and I just used the existing plastic loops to hang the mobile pieces from.

Drumroll please…

Ta-Da!

And the all-important baby view of the mobile – a purple starfish is going in the empty spot

Ocean Nursery Update 3 – The Squid Dresser

We’re getting close to the finish line with this pregnancy so I’ve been insane about finishing up all our little projects for the nursery (also called nesting)- the good news is that most of them were started long ago and are just waiting on a few final touches. For example, the dresser. The dresser was delayed because of super humid days and lots of rain which didn’t work out so well for airbrushing with water-based paint (i.e. on humid days, it seemed hours of work could come right off if you just breathed too strongly on it). Luckily, the weather finally cooperated!

The dresser re-do only had 4 steps:

  1. changing the ugly drawer pulls
  2. painting the dresser blue
  3. airbrushing a cool design
  4. clear-coat to protect it and seal in any VOCs from the airbrushing

The drawer pulls were originally brass but are pictured below right after we tried painting them blue to match the dresser. Still ugly and too busy looking, so we decided to replace them with really simple round knobs. Also my husband and I both hated how noisy drawer pulls like these are (especially when your toddler figures out how to lift and drop the handles). Unfortunately, the screw holes from the original drawer pulls were too large (and although we could have suffered, the outer holes seemed too far apart and the inner holes too close together) so Nick drilled new holes for our knobs and puttied the old ones.

New dresser knobs

old dresser handles – didn’t like them in blue either

Step number 2 was to paint the dresser blue in our fabulous No-VOC Mythic Paint (we went with the Blue Cadet color). I love how just changing the color made it immediately look so much happier! I was originally voting for a white dresser but I’m glad I let Nick change my mind. And I never really noticed the cool scrolling on the bottom of the dresser until after we’d painted it – kind of like some edgy design you’d see on a piece at IKEA. (yes, I love IKEA).

dresser and daughter in blue

And the final step was my husband’s vision. He decided on a squid, in keeping with our ocean theme, and when I mentioned that the white splatter-like detail on his tentacles reminded me of a view of the universe from space, he was inspired to add some stars as background (also our little Muffin absolutely LOVES stars).

finished squid on dresser

Forgot to drill holes for knobs on the test drawer – oops.
And sorry about the lighting (we have a yellow sun light in the bedroom) but Ta-Da!

Ocean Nursery Update 2 – Turning the Mini Crib into a Toddler Bed

We originally bought a mini crib for baby #1 because we were living in a tiny one bedroom apartment and honestly couldn’t fit a full size crib  (I even gave up one of my 3 dressers to fit the mini – oh parenthood). Luckily my husband, Nick, and I are small people and O is no different, so we never felt the need to swap up to a standard crib. Little O is now 2 years old and still seems totally happy with it. Pregnant mommy, however, is no longer okay with lifting her into the crib anymore – ouch! So we decided it was time to convert her mini crib into a toddler bed. Unfortunately, this turned out to be more complicated than originally anticipated.

Our mini crib (and most others) will convert into a twin bed, but I thought that would be too big a change right now with baby #2 coming so soon – at least with 3 sides of her crib still up, she’d still have that safe, enclosed feeling she’s gotten used to and hopefully make it an easy transition. Now, lots of full size cribs have ready-made toddler conversion rails to turn a crib into a daybed, but after hours of searching, I’m almost positive they just don’t exist for mini cribs. My first thought was since the standard size rails look like a sideways letter P, maybe we could get one meant for a full size crib and just cut off part of the long stem to fit. But unfortunately the tall part that keeps you child from rolling out of bed (the loop of the P in my example) measured pretty much the entire length of the mini crib, so there’d be no way for O to crawl in. I realized we were going to have to make it ourselves.

Inspiration – the Muu Sam

I found the Muu Sam crib above while doing my search for the non-existent mini crib conversion rails and fell in love. My husband originally wanted to just cut the existing side that would be taken off anyway (which would mean the toddler rail would have slats instead of this pretty flat surface to paint on), but that side becomes the headboard or footboard when converting to a twin bed, so we’re definitely not destroying it (we will have to come up with something crafty to use the 2 short sides for though, when the time comes). Luckily, Nick is great at projects like these and has friends with big tools (thanks Greg!) so he got to measuring. We wanted to make sure the rail would line up with the original screw holes that were already in the crib to hold the 4th side up. We also learned O is obsessed with inserting pegs/screws/bolts into holes (you can see her toddler hands helping out in the photo below – time to get her a baby tool kit!).

Clearly so excited :)

Once the rail was glued and assembled, Nick painted it white – yes, unlike in the disaster of Nursery Update 1, we did it the right way this time – with 2 coats of Mythic zero-VOC paint. We still think better safe than sorry when it comes to paint fumes though, so I was ousted from helping with the large area painting (Nick was also doing coats of blue on the dresser). But I did pull out my non-toxic acrylic craft paint to do the sharks (in our open, well-ventilated garage with stretching breaks). And here’s the finished product:

Ocean Nursery Update 1 – A.K.A. The Disaster

The changing table – newly painted with toxins :(

We got started on our nursery redecorating project by painting the changing table. The table was a pretty blonde wood but nothing else in the room matched, so my husband and I went down to Home Depot. Now, I’m a research fiend so this is embarrassing, but it really must have been due to a case a pregnancy brain, because we bought regular white spray paint. My husband carried the table outside, gave it a nice paint job and stuck it in the garage to dry. The next day I ask if we can bring it inside and hubby says “Maybe. I’ll bring it inside and we’ll know pretty quickly if it has aired out enough.” ….. Cue light above my head clicking on (and some thunder and lightning for dramatic effect):

  1. VOCs
  2. Pregnant women and young children are NOT supposed to be exposed to paint fumes
  3. Why did some part of me just assume spray paint wasn’t actual paint that could be harmful?

I believe there was a sheepish and panicked smile quickly aimed over my shoulder as I ran over to my computer. And I’m sure there was some eye-rolling from his direction. Turns out spray paint is actually the WORST kind of paint we could have possibly picked with some of the highest levels of VOCs.

VOCs are harmful chemicals (linked to a variety of health effects including eye, nose and throat irritation; dizziness; liver, kidney and central nervous system damage and even cancer) that offgas (or outgas) for long periods of time at normal room temperatures (small amounts could even be released for the entire lifetime of the paint). You can read more scary details using the link at #1 in my list above if you like.

So,we bought some Zero-VOC paint from Mythic Paint (another great option is Lullaby Paints) hoping we could just paint over the spray paint and seal in the nasty VOCs. Unfortunately, no-VOC paints are made to be breathable, so they’ll lessen the VOCs emitted but no where near completely seal them off. Back to the drawing board.

Using paint stripper was going to be toxic also, plus some parts of the changing table appeared to be pressed wood or some other type of processed wood (it was a hand-me-down gift, so no way to visit the retailer to know for sure) so sanding the table down could release formaldehyde and more fun, harmful stuff!! (the upside and downside of research is finding other relevant topics). I was getting ready to tell my husband we just needed to suck it up, toss the table and replace it when I finally found a solution: we could paint a new layer of a non-toxic, clear gloss sealer… and hopefully it won’t discolor the paint requiring us to do one more coat of the zero-VOC (update: my husband is developing an eye twitch).

To do this the right way the first time, use a no or low-VOC primer or sealer on any particle board or processed wood items and definitely before painting them. Then always (cause it’s good to protect the adults too), but especially if you have or are expecting children, use a zero-VOC paint. We’ll be using whatever is leftover of the sealer on our IKEA bookshelves. Sigh.

The Ocean Themed Nursery – Before

This room had no overhead light so we created one – IKEA sun lamp
(cord in plastic tracking goes to wall outlet)

No, it’s not perfectly spotless – let’s be real here

Unit for books and toys

So we’re starting this redecorating project with an obvious mishmash of old items (like the dresser which still contains mostly mommy’s seasonal stuff) and new items (the crib) along with things we were given to us (the changing table, the glider) and a few things we crafted ourselves (the mobile). Everything was originally purchased/obtained for our now 2 year old when she was a baby. And back then we didn’t have a separate room for her so our setup was quite a bit different. Now that we have a second baby coming (and I’m totally nesting!!), my husband and I wanted to really get this room pulled together and perfect.  Right now the only ocean-themed items we have are the color palette, the mobile and most of the art.

This is a real-time project so sorry it may take a while before the completed “After” pictures can be posted, but we do have a deadline, #2 is coming in about 3 months! And I’ll be posting pictures along the way.

Other things to note: we’re leasing so we cannot paint or wallpaper the walls (well, we could, but I don’t want to have to re-paint it back white later). Yes, all the adorable nursery layouts in magazines always have cute wall colors, etc., but we’re just going to have to do without that for now and I think it’ll still look amazing. Changing the carpet, likewise, sadly, not an option (at least it’s “sandy” colored). And second, let’s consider this DIY on a budget – yes, we could just buy a new changing table and dresser that matches the crib, but it seems like such a waste, both are perfectly good, and modifying them can be super fun!

To-Do List:

  • Replace silver frames on artwork above the crib with black frames (that actually fit the images, haha) like the rest of the room
  • Get those few other art pieces I’ve been waiting on
  • Replace Diaper Genie (which did work well for 2 years) with a hot blue Ubbi diaper pail (we need a pail with a locking top b/c of a curious toddler and the blue will look awesome)
  • Remove bottom 2 dresser drawers and replace with 2 open shelves (so we can put fabric bins there for our 2 year old’s clothes and keep the existing bins under the changing table for our new baby boy’s clothes). We want little O to be able to access her clothes, versus keeping them in the closet, so she can soon practice dressing herself. This one is a maybe? It seems simple in thought, maybe not so much in practice. We’ll see.
  • Paint dresser (white or blue?) and then my husband will be painting on a jellyfish scene (he has “a vision”)
  • Paint changing table white
  • Paint glider white (currently a creamy color)
  • Make slip-covers for the glider (depending on finished look of dresser, I’m thinking maybe something green-ish like the color of the changing pad?) or if I’m really brave, maybe a complete makeover?
  • Get actual curtain tiebacks or holdbacks – starfish? (instead of the chip clips I’m currently using – which work great, but not so cute)
  • Replace pink fabric toy bins in bookshelf with blue or dark purple (pink must have been on sale or something back when I got them)
  • Additional shelving on the only wall not pictured?
  • Definitely getting this adorable octopus hook for coats

Let me know your thoughts and ideas too! And if you love ocean themes, check out my Pinterest board of the same name.

%d bloggers like this: